Once a week, I get the privilege of having a handful of 4-year-olds come over to my house for a little preschool time. We have so much fun together, I thought I’d share our days with you. Each week we have a different theme and our schedule follows the same pattern: an hour of school skills, an hour of art, snack time, active group play, free play (including some form of sensory play) at various play stations.
THIS WEEK’S THEME WAS SNOWMEN!
We started our day practicing tracing and cutting skills. The kids took turns sharing a couple of snowman shaped patterns which they used to trace the shape on their cardstock. Next they cut the snowmen out — a little tricky to get in the points, but they handled it well. Each child drew a face on their snowman and glued on one of the scarves I had created out of scrapbook paper. I had also created hats out of the same pieces of scrapbook paper and put a number from 1-12 on each one. It was time to begin our game.


The children took turns picking a hat, turning it over to reveal the number and then placing the hat upon their snowman. They got really excited when the hat paper matched their scarf paper. Now the task was to place as many buttons on the snowman as the hat showed. Once we checked to see if they had the right amount, they would switch hats and add or subtract buttons to match the new number. They were not really taking turns, but all working on their buttons and switching hats randomly whenever they completed their task. This game was far more engaging than I anticipated and the kids really enjoyed it. Here is the post where I got the idea.
Next, we made snowmen out of glue which I got from this link. I did a sample snowman, but it didn’t have the whole 2-3 days drying time necessary to be completely done by the day of class. I was rather dismayed as it dried because the glue seemed to be absorbing into the wax paper and I thought I hadn’t used enough glue. I didn’t realize this was exactly how it was supposed to look, so when the kids made theirs I kept encouraging them to use more glue. While this didn’t hurt their final products at all, it did mean more drying time — about 3 days total for the thickest ones. The final product had a milky translucency to it and is semi-stiff/semi-flexible.


Probably the best activity of the day was the melting snowmen which I got from this link. Preparation involved dropping 2 beads and an orange felt triangle in the bottom of a cup, then stuffing the cup with a mixture of baking soda and water mixed to a stiff claylike consistency with a little silver glitter mixed in for fun. I used red Solo “shot glasses” and I wouldn’t recommend going any bigger than that. After I firmly packed the cup about half-full, I threw in a couple of sequin “buttons” and inserted two pieces of toothpicks down the side for arms. Then I set them on the front porch overnight to freeze. This worked great since temperatures were below zero last week.
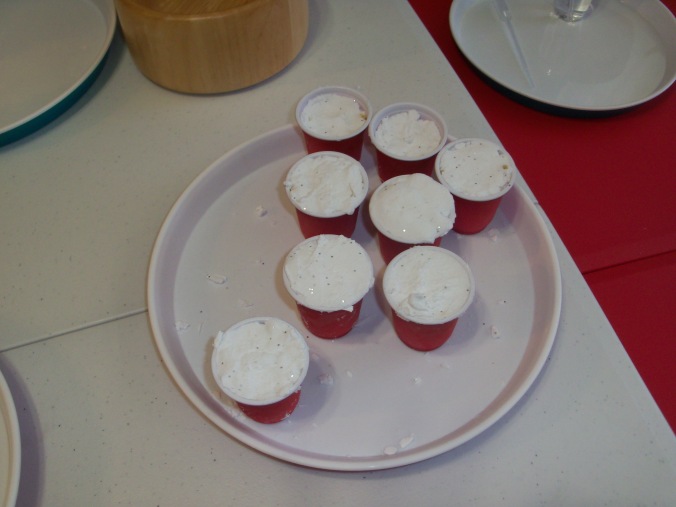
Our frozen snowmen awaiting release.
It took some doing to get the snowmen out of the cup. They were REALLY frozen solid! We dipped them in hot water, rolled them in our hands, dipped them again and squeezed and prodded until finally, they worked their way out. It was so fun to see the unique facial expressions each one was “born” with. Each child was given one snowman on a plastic tray and a 3 oz. spray bottle filled with vinegar. We also set out small bowls of vinegar and equipped each child with a plastic pipette. Then we set them loose instructing them to melt the snowmen with their vinegar. Because the baking soda concoction was frozen it didn’t react as abruptly as the baking soda and vinegar volcano many of us have done. Each squirt resulted in a satisfying little fizzle and a tiny bit of melting. The kids began debating which worked better, the spray bottle or the pipette. One child figured out (after using all the vinegar in his spray bottle) that he could then suck up the pool of vinegar off his tray and refill his bottle. Then he discovered pouring the vinegar onto the snowman out of the open bottle was a VERY effective method for melting him. This project kept all the children completely engaged until the snowmen were totally melted. In all, it took 20-25 minutes. Wanting to let the children linger over this learning experiment, I decided to knock a few activities off of our list rather than rush this project.


Next, we read the book Snowmen at Night, by Caralyn Buehner and then let the kids draw their own “snowmen at night” pictures with chalk on dark blue paper. We used colored chalk, but most of the kids chose to just use white anyway.


Snack time consisted of a marshmallow snowman in a field of popcorn “snow” with a side of snowman noses.
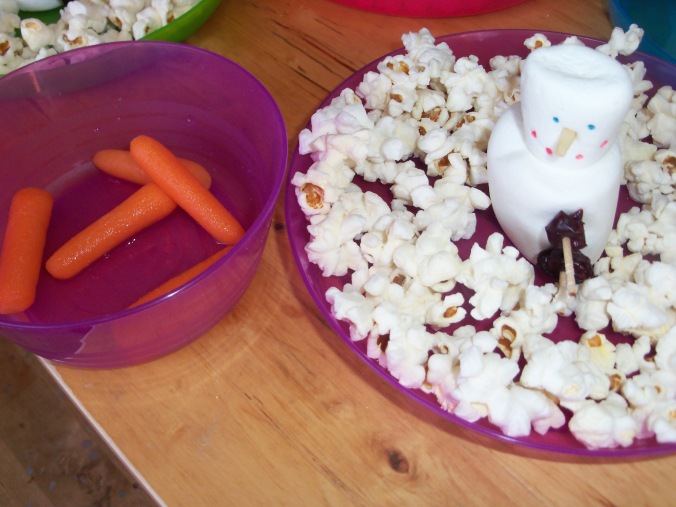
I should have cut the button toothpicks shorter, so they didn’t look like daggers, but I was in a hurry. I dipped a toothpick in food coloring to make the face and used a slivered almond for the nose.
It was time to get active so we split the kids into two teams and equipped each team with a bucket of snowball. With a barrier set between the teams, we let the snowballs fly. This activity rivaled the melting snowmen as a favorite, and I think the kids could have gone on forever.


While the snowmen-faced balls are adorable and soft, the plain ones have an incredible texture that feels just like you are packing a real snowball when you squeeze them.
Our sensory play consisted of snow dough. Again, this was such a fun texture to work with. It is a simple concoction of baking soda and conditioner in about a 4/1 ratio. (I used a bit more conditioner than the original post suggested.) You’ll know the right proportions by feel. At first, it sticks together but is rather crumbly but as you mix in more conditioner, you get a silky soft feel to it. It still looks like real snow though. This packs nicely and can be formed into a snowman. It’s still crumbly and your hands will get messy, but both these ingredients rinse off easily and will not clog your drain.


I put out a nice selection of snowman accouterments to try to encourage the kids to build one more snowman, but most of them just wanted to immerse themselves in the texture of the dough. One little girl found a coal shovel in the train set and decided to use it to shovel snow.
Taking a break from snowmen, we ended the day by building a magnificent Duplo train track through the rooms.


So fun! We love that book too. Not all our pop-ups function well anymore.
LikeLike
What? Pop-ups? Our book didn’t have pop ups!
LikeLike
You are so amazingly talented and patient and creative. I don’t know how you do it, but it sure looks fun. I would like to be in your class and play with things like this too, and I am an old lady!
LikeLike
Thanks Linda. I’ve jokingly said I’m going to start a pre-school for moms. I’ve had more than a few requests. 🙂
LikeLike
You are seriously amazing!!! All those activities sound awesome. I wish I lived closer to my nephews, so I could do this with them.
LikeLike
So much fun! I would love to play at your pre-school day!
LikeLike